AQS 介绍
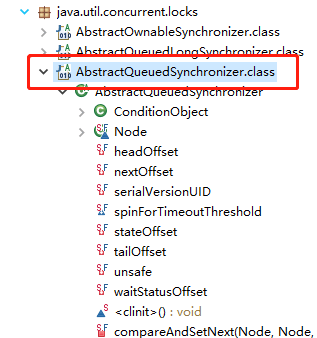
AQS 的全称为 AbstractQueuedSynchronizer ,翻译过来的意思就是抽象队列同步器。这个类在 java.util.concurrent.locks 包下面。

AQS 就是一个抽象类,主要用来构建锁和同步器。
public abstract class AbstractQueuedSynchronizer extends AbstractOwnableSynchronizer implements java.io.Serializable {
}
AQS 为构建锁和同步器提供了一些通用功能的实现,因此,使用 AQS 能简单且高效地构造出应用广泛的大量的同步器,比如我们提到的 ReentrantLock,Semaphore,其他的诸如 ReentrantReadWriteLock,SynchronousQueue等等皆是基于 AQS 的。
AQS 原理
在面试中被问到并发知识的时候,大多都会被问到“请你说一下自己对于 AQS 原理的理解”。下面给大家一个示例供大家参考,面试不是背题,大家一定要加入自己的思想,即使加入不了自己的思想也要保证自己能够通俗的讲出来而不是背出来。
AQS 核心思想(加锁会导致阻塞:有阻塞就需要排队,实现排队必然需要有某种形式的队列来进行管理)
AQS 核心思想是,如果被请求的共享资源空闲,则将当前请求资源的线程设置为有效的工作线程,并且将共享资源设置为锁定状态。如果被请求的共享资源被占用,那么就需要一套线程阻塞等待以及被唤醒时锁分配的机制,这个机制 AQS 是基于 CLH 锁 (Craig, Landin, and Hagersten locks) 实现的。
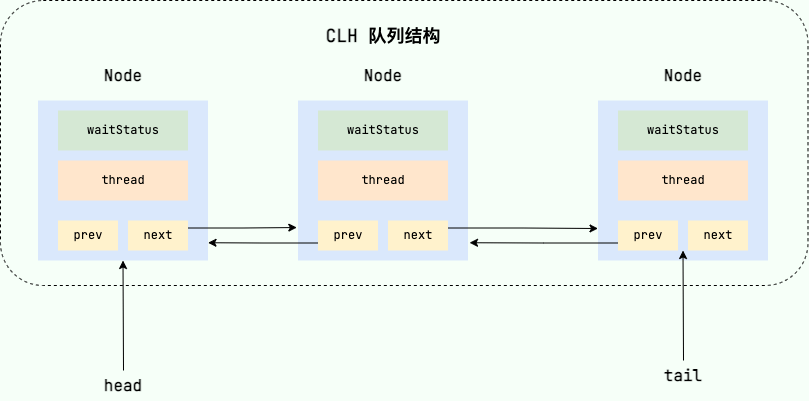
CLH 锁是对自旋锁的一种改进,是一个虚拟的双向队列(虚拟的双向队列即不存在队列实例,仅存在结点之间的关联关系),暂时获取不到锁的线程将被加入到该队列中。AQS 将每条请求共享资源的线程封装成一个 CLH 队列锁的一个结点(Node)来实现锁的分配。在 CLH 队列锁中,一个节点表示一个线程,它保存着线程的引用(thread)、 当前节点在队列中的状态(waitStatus)、前驱节点(prev)、后继节点(next)。
CLH 队列结构如下图所示:

关于 AQS 核心数据结构-CLH 锁的详细解读,强烈推荐阅读 Java AQS 核心数据结构-CLH 锁 - Qunar 技术沙龙 这篇文章。
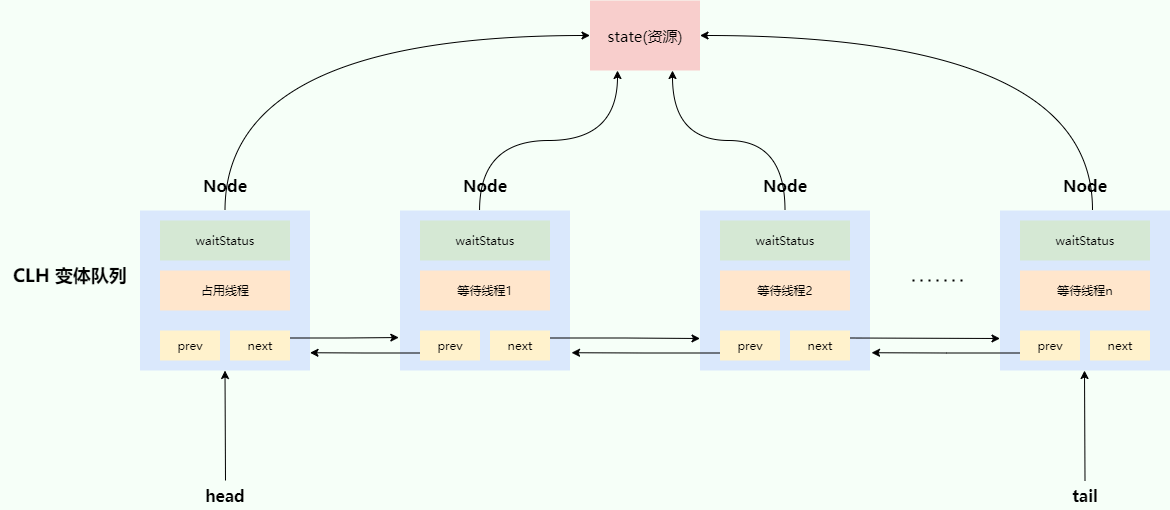
AQS(AbstractQueuedSynchronizer)的核心原理图:

AQS 使用 int 成员变量 state 表示同步状态,通过内置的 FIFO 线程等待/等待队列 来完成获取资源线程的排队工作。
state 变量由 volatile 修饰,用于展示当前临界资源的获锁情况。
// 共享变量,使用volatile修饰保证线程可见性
private volatile int state;
另外,状态信息 state 可以通过 protected 类型的getState()、setState()和compareAndSetState() 进行操作。并且,这几个方法都是 final 修饰的,在子类中无法被重写。
//返回同步状态的当前值
protected final int getState() {
     return state;
}
 // 设置同步状态的值
protected final void setState(int newState) {
     state = newState;
}
//原子地(CAS操作)将同步状态值设置为给定值update如果当前同步状态的值等于expect(期望值)
protected final boolean compareAndSetState(int expect, int update) {
      return unsafe.compareAndSwapInt(this, stateOffset, expect, update);
}
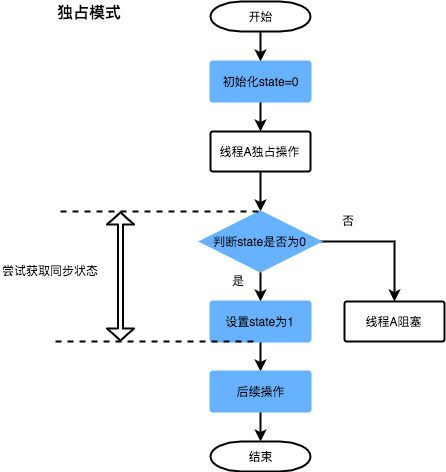
以可重入的互斥锁 ReentrantLock 为例,它的内部维护了一个 state 变量,用来表示锁的占用状态。state 的初始值为 0,表示锁处于未锁定状态。当线程 A 调用 lock() 方法时,会尝试通过 tryAcquire() 方法独占该锁,并让 state 的值加 1。如果成功了,那么线程 A 就获取到了锁。如果失败了,那么线程 A 就会被加入到一个等待队列(CLH 队列)中,直到其他线程释放该锁。假设线程 A 获取锁成功了,释放锁之前,A 线程自己是可以重复获取此锁的(state 会累加)。这就是可重入性的体现:一个线程可以多次获取同一个锁而不会被阻塞。但是,这也意味着,一个线程必须释放与获取的次数相同的锁,才能让 state 的值回到 0,也就是让锁恢复到未锁定状态。只有这样,其他等待的线程才能有机会获取该锁。
线程 A 尝试获取锁的过程如下图所示(图源从 ReentrantLock 的实现看 AQS 的原理及应用 - 美团技术团队):

再以倒计时器 CountDownLatch 以例,任务分为 N 个子线程去执行,state 也初始化为 N(注意 N 要与线程个数一致)。这 N 个子线程开始执行任务,每执行完一个子线程,就调用一次 countDown() 方法。该方法会尝试使用 CAS(Compare and Swap) 操作,让 state 的值减少 1。当所有的子线程都执行完毕后(即 state 的值变为 0),CountDownLatch 会调用 unpark() 方法,唤醒主线程。这时,主线程就可以从 await() 方法(CountDownLatch 中的await() 方法而非 AQS 中的)返回,继续执行后续的操作。
AQS 资源共享方式
AQS 定义两种资源共享方式:Exclusive(独占,只有一个线程能执行,如ReentrantLock)和Share(共享,多个线程可同时执行,如Semaphore/CountDownLatch)。
一般来说,自定义同步器的共享方式要么是独占,要么是共享,他们也只需实现tryAcquire-tryRelease、tryAcquireShared-tryReleaseShared中的一种即可。但 AQS 也支持自定义同步器同时实现独占和共享两种方式,如ReentrantReadWriteLock。
自定义同步器
同步器的设计是基于模板方法模式的,如果需要自定义同步器一般的方式是这样(模板方法模式很经典的一个应用):
- 使用者继承
AbstractQueuedSynchronizer并重写指定的方法。 - 将 AQS 组合在自定义同步组件的实现中,并调用其模板方法,而这些模板方法会调用使用者重写的方法。
这和我们以往通过实现接口的方式有很大区别,这是模板方法模式很经典的一个运用。
AQS 使用了模板方法模式,自定义同步器时需要重写下面几个 AQS 提供的钩子方法:
//独占方式。尝试获取资源,成功则返回true,失败则返回false。
protected boolean tryAcquire(int)
//独占方式。尝试释放资源,成功则返回true,失败则返回false。
protected boolean tryRelease(int)
//共享方式。尝试获取资源。负数表示失败;0表示成功,但没有剩余可用资源;正数表示成功,且有剩余资源。
protected int tryAcquireShared(int)
//共享方式。尝试释放资源,成功则返回true,失败则返回false。
protected boolean tryReleaseShared(int)
//该线程是否正在独占资源。只有用到condition才需要去实现它。
protected boolean isHeldExclusively()
什么是钩子方法呢? 钩子方法是一种被声明在抽象类中的方法,一般使用 protected 关键字修饰,它可以是空方法(由子类实现),也可以是默认实现的方法。模板设计模式通过钩子方法控制固定步骤的实现。
篇幅问题,这里就不详细介绍模板方法模式了,不太了解的小伙伴可以看看这篇文章:用 Java8 改造后的模板方法模式真的是 yyds!。
除了上面提到的钩子方法之外,AQS 类中的其他方法都是 final ,所以无法被其他类重写。
常见同步工具类
下面介绍几个基于 AQS 的常见同步工具类。
Semaphore(信号量)
介绍
synchronized 和 ReentrantLock 都是一次只允许一个线程访问某个资源,而Semaphore(信号量)可以用来控制同时访问特定资源的线程数量。
Semaphore 的使用简单,我们这里假设有 N(N>5) 个线程来获取 Semaphore 中的共享资源,下面的代码表示同一时刻 N 个线程中只有 5 个线程能获取到共享资源,其他线程都会阻塞,只有获取到共享资源的线程才能执行。等到有线程释放了共享资源,其他阻塞的线程才能获取到。
// 初始共享资源数量
final Semaphore semaphore = new Semaphore(5);
// 获取1个许可
semaphore.acquire();
// 释放1个许可
semaphore.release();
当初始的资源个数为 1 的时候,Semaphore 退化为排他锁。
Semaphore 有两种模式:。
- 公平模式: 调用
acquire()方法的顺序就是获取许可证的顺序,遵循 FIFO; - 非公平模式: 抢占式的。
Semaphore 对应的两个构造方法如下:
public Semaphore(int permits) {
  	sync = new NonfairSync(permits);
}

public Semaphore(int permits, boolean fair) {
  	sync = fair ? new FairSync(permits) : new NonfairSync(permits);
}
这两个构造方法,都必须提供许可的数量,第二个构造方法可以指定是公平模式还是非公平模式,默认非公平模式。
Semaphore 通常用于那些资源有明确访问数量限制的场景比如限流(仅限于单机模式,实际项目中推荐使用 Redis +Lua 来做限流)。
原理
Semaphore 是共享锁的一种实现,它默认构造 AQS 的 state 值为 permits,你可以将 permits 的值理解为许可证的数量,只有拿到许可证的线程才能执行。
以无参 acquire 方法为例,调用semaphore.acquire() ,线程尝试获取许可证,如果 state > 0 的话,则表示可以获取成功,如果 state <= 0 的话,则表示许可证数量不足,获取失败。
如果可以获取成功的话(state > 0 ),会尝试使用 CAS 操作去修改 state 的值 state=state-1。如果获取失败则会创建一个 Node 节点加入等待队列,挂起当前线程。
// 获取1个许可证
public void acquire() throws InterruptedException {
 	 sync.acquireSharedInterruptibly(1);
}

// 获取一个或者多个许可证
public void acquire(int permits) throws InterruptedException {
    if (permits < 0) throw new IllegalArgumentException();
    sync.acquireSharedInterruptibly(permits);
}acquireSharedInterruptibly方法是 AbstractQueuedSynchronizer 中的默认实现。
// 共享模式下获取许可证,获取成功则返回,失败则加入等待队列,挂起线程
public final void acquireSharedInterruptibly(int arg)
    throws InterruptedException {
    if (Thread.interrupted())
      throw new InterruptedException();
        // 尝试获取许可证,arg为获取许可证个数,当获取失败时,则创建一个节点加入等待队列,挂起当前线程。
    if (tryAcquireShared(arg) < 0)
      doAcquireSharedInterruptibly(arg);
}这里再以非公平模式(NonfairSync)的为例,看看 tryAcquireShared 方法的实现。
// 共享模式下尝试获取资源(在Semaphore中的资源即许可证):
protected int tryAcquireShared(int acquires) {
    return nonfairTryAcquireShared(acquires);
}

// 非公平的共享模式获取许可证
final int nonfairTryAcquireShared(int acquires) {
    for (;;) {
        // 当前可用许可证数量
        int available = getState();
        /*
         * 尝试获取许可证,当前可用许可证数量小于等于0时,返回负值,表示获取失败,
         * 当前可用许可证大于0时才可能获取成功,CAS失败了会循环重新获取最新的值尝试获取
         */
        int remaining = available - acquires;
        if (remaining < 0 ||
            compareAndSetState(available, remaining))
            return remaining;
    }
}
以无参 release 方法为例,调用semaphore.release(); ,线程尝试释放许可证,并使用 CAS 操作去修改 state 的值 state=state+1。释放许可证成功之后,同时会唤醒等待队列中的一个线程。被唤醒的线程会重新尝试去修改 state 的值 state=state-1 ,如果 state > 0 则获取令牌成功,否则重新进入等待队列,挂起线程。
// 释放一个许可证
public void release() {
  	sync.releaseShared(1);
}

// 释放一个或者多个许可证
public void release(int permits) {
    if (permits < 0) throw new IllegalArgumentException();
    sync.releaseShared(permits);
}releaseShared方法是 AbstractQueuedSynchronizer 中的默认实现。
// 释放共享锁
// 如果 tryReleaseShared 返回 true,就唤醒等待队列中的一个或多个线程。
public final boolean releaseShared(int arg) {
    //释放共享锁
    if (tryReleaseShared(arg)) {
      //释放当前节点的后置等待节点
      doReleaseShared();
      return true;
    }
    return false;
}
tryReleaseShared 方法是Semaphore 的内部类 Sync 重写的一个方法, AbstractQueuedSynchronizer中的默认实现仅仅抛出 UnsupportedOperationException 异常。
// 内部类 Sync 中重写的一个方法
// 尝试释放资源
protected final boolean tryReleaseShared(int releases) {
    for (;;) {
        int current = getState();
        // 可用许可证+1
        int next = current + releases;
        if (next < current) // overflow
            throw new Error("Maximum permit count exceeded");
         // CAS修改state的值
        if (compareAndSetState(current, next))
            return true;
    }
}
可以看到,上面提到的几个方法底层基本都是通过同步器 sync 实现的。Sync 是 CountDownLatch 的内部类 , 继承了 AbstractQueuedSynchronizer ,重写了其中的某些方法。并且,Sync 对应的还有两个子类 NonfairSync(对应非公平模式) 和 FairSync(对应公平模式)。
private static final class Sync extends AbstractQueuedSynchronizer {
  // ...
}
static final class NonfairSync extends Sync {
  // ...
}
static final class FairSync extends Sync {
  // ...
}
实战
public class SemaphoreExample {
  // 请求的数量
  private static final int threadCount = 550;

  public static void main(String[] args) throws InterruptedException {
    // 创建一个具有固定线程数量的线程池对象(如果这里线程池的线程数量给太少的话你会发现执行的很慢)
    ExecutorService threadPool = Executors.newFixedThreadPool(300);
    // 初始许可证数量
    final Semaphore semaphore = new Semaphore(20);

    for (int i = 0; i < threadCount; i++) {
      final int threadnum = i;
      threadPool.execute(() -> {// Lambda 表达式的运用
        try {
          semaphore.acquire();// 获取一个许可,所以可运行线程数量为20/1=20
          test(threadnum);
          semaphore.release();// 释放一个许可
        } catch (InterruptedException e) {
          // TODO Auto-generated catch block
          e.printStackTrace();
        }

      });
    }
    threadPool.shutdown();
    System.out.println("finish");
  }

  public static void test(int threadnum) throws InterruptedException {
    Thread.sleep(1000);// 模拟请求的耗时操作
    System.out.println("threadnum:" + threadnum);
    Thread.sleep(1000);// 模拟请求的耗时操作
  }
}
执行 acquire() 方法阻塞,直到有一个许可证可以获得然后拿走一个许可证;每个 release 方法增加一个许可证,这可能会释放一个阻塞的 acquire() 方法。然而,其实并没有实际的许可证这个对象,Semaphore 只是维持了一个可获得许可证的数量。 Semaphore 经常用于限制获取某种资源的线程数量。
当然一次也可以一次拿取和释放多个许可,不过一般没有必要这样做:
semaphore.acquire(5);// 获取5个许可,所以可运行线程数量为20/5=4
test(threadnum);
semaphore.release(5);// 释放5个许可
除了 acquire() 方法之外,另一个比较常用的与之对应的方法是 tryAcquire() 方法,该方法如果获取不到许可就立即返回 false。
Semaphore与CountDownLatch一样,也是共享锁的一种实现。它默认构造 AQS 的state为permits。当执行任务的线程数量超出permits,那么多余的线程将会被放入等待队列Park,并自旋判断state是否大于 0。只有当state大于 0 的时候,阻塞的线程才能继续执行,此时先前执行任务的线程继续执行release()方法,release()方法使得 state 的变量会加 1,那么自旋的线程便会判断成功。 如此,每次只有最多不超过permits数量的线程能自旋成功,便限制了执行任务线程的数量。
CountDownLatch (倒计时器)
介绍
CountDownLatch 允许 count 个线程阻塞在一个地方,直至所有线程的任务都执行完毕。
CountDownLatch 是一次性的,计数器的值只能在构造方法中初始化一次,之后没有任何机制再次对其设置值,当 CountDownLatch 使用完毕后,它不能再次被使用。
原理
CountDownLatch 是共享锁的一种实现,它默认构造 AQS 的 state 值为 count。这个我们通过 CountDownLatch 的构造方法即可看出。
public CountDownLatch(int count) {
    if (count < 0) throw new IllegalArgumentException("count < 0");
    this.sync = new Sync(count);
}

private static final class Sync extends AbstractQueuedSynchronizer {
    Sync(int count) {
        setState(count);
    }
  //...
}
当线程调用 countDown() 时,其实使用了tryReleaseShared方法以 CAS 的操作来减少 state,直至 state 为 0 。当 state 为 0 时,表示所有的线程都调用了 countDown 方法,那么在 CountDownLatch 上等待的线程就会被唤醒并继续执行。
public void countDown() {
    // Sync 是 CountDownLatch 的内部类 , 继承了 AbstractQueuedSynchronizer
    sync.releaseShared(1);
}releaseShared方法是 AbstractQueuedSynchronizer 中的默认实现。
// 释放共享锁
// 如果 tryReleaseShared 返回 true,就唤醒等待队列中的一个或多个线程。
public final boolean releaseShared(int arg) {
    //释放共享锁
    if (tryReleaseShared(arg)) {
      //释放当前节点的后置等待节点
      doReleaseShared();
      return true;
    }
    return false;
}
tryReleaseShared 方法是CountDownLatch 的内部类 Sync 重写的一个方法, AbstractQueuedSynchronizer中的默认实现仅仅抛出 UnsupportedOperationException 异常。
// 对 state 进行递减,直到 state 变成 0;
// 只有 count 递减到 0 时,countDown 才会返回 true
protected boolean tryReleaseShared(int releases) {
    // 自选检查 state 是否为 0
    for (;;) {
        int c = getState();
        // 如果 state 已经是 0 了,直接返回 false
        if (c == 0)
            return false;
        // 对 state 进行递减
        int nextc = c-1;
        // CAS 操作更新 state 的值
        if (compareAndSetState(c, nextc))
            return nextc == 0;
    }
}
以无参 await方法为例,当调用 await() 的时候,如果 state 不为 0,那就证明任务还没有执行完毕,await() 就会一直阻塞,也就是说 await() 之后的语句不会被执行(main 线程被加入到等待队列也就是 CLH 队列中了)。然后,CountDownLatch 会自旋 CAS 判断 state == 0,如果 state == 0 的话,就会释放所有等待的线程,await() 方法之后的语句得到执行。
// 等待(也可以叫做加锁)
public void await() throws InterruptedException {
    sync.acquireSharedInterruptibly(1);
}
// 带有超时时间的等待
public boolean await(long timeout, TimeUnit unit)
    throws InterruptedException {
    return sync.tryAcquireSharedNanos(1, unit.toNanos(timeout));
}acquireSharedInterruptibly方法是 AbstractQueuedSynchronizer 中的默认实现。
// 尝试获取锁,获取成功则返回,失败则加入等待队列,挂起线程
public final void acquireSharedInterruptibly(int arg)
    throws InterruptedException {
    if (Thread.interrupted())
      throw new InterruptedException();
        // 尝试获得锁,获取成功则返回
    if (tryAcquireShared(arg) < 0)
      // 获取失败加入等待队列,挂起线程
      doAcquireSharedInterruptibly(arg);
}
tryAcquireShared 方法是CountDownLatch 的内部类 Sync 重写的一个方法,其作用就是判断 state 的值是否为 0,是的话就返回 1,否则返回 -1。
protected int tryAcquireShared(int acquires) {
    return (getState() == 0) ? 1 : -1;
}
实战
CountDownLatch 的两种典型用法:
- 某一线程在开始运行前等待 n 个线程执行完毕 : 将
CountDownLatch的计数器初始化为 n (new CountDownLatch(n)),每当一个任务线程执行完毕,就将计数器减 1 (countdownlatch.countDown()),当计数器的值变为 0 时,在CountDownLatch 上 await()的线程就会被唤醒。一个典型应用场景就是启动一个服务时,主线程需要等待多个组件加载完毕,之后再继续执行。 - 实现多个线程开始执行任务的最大并行性:注意是并行性,不是并发,强调的是多个线程在某一时刻同时开始执行。类似于赛跑,将多个线程放到起点,等待发令枪响,然后同时开跑。做法是初始化一个共享的
CountDownLatch对象,将其计数器初始化为 1 (new CountDownLatch(1)),多个线程在开始执行任务前首先coundownlatch.await(),当主线程调用countDown()时,计数器变为 0,多个线程同时被唤醒。
CountDownLatch 代码示例:
public class CountDownLatchExample {
  // 请求的数量
  private static final int THREAD_COUNT = 550;

  public static void main(String[] args) throws InterruptedException {
    // 创建一个具有固定线程数量的线程池对象(如果这里线程池的线程数量给太少的话你会发现执行的很慢)
    // 只是测试使用,实际场景请手动赋值线程池参数
    ExecutorService threadPool = Executors.newFixedThreadPool(300);
    final CountDownLatch countDownLatch = new CountDownLatch(THREAD_COUNT);
    for (int i = 0; i < THREAD_COUNT; i++) {
      final int threadNum = i;
      threadPool.execute(() -> {
        try {
          test(threadNum);
        } catch (InterruptedException e) {
          e.printStackTrace();
        } finally {
          // 表示一个请求已经被完成
          countDownLatch.countDown();
        }

      });
    }
    countDownLatch.await();
    threadPool.shutdown();
    System.out.println("finish");
  }

  public static void test(int threadnum) throws InterruptedException {
    Thread.sleep(1000);
    System.out.println("threadNum:" + threadnum);
    Thread.sleep(1000);
  }
}
上面的代码中,我们定义了请求的数量为 550,当这 550 个请求被处理完成之后,才会执行System.out.println("finish");。
与 CountDownLatch 的第一次交互是主线程等待其他线程。主线程必须在启动其他线程后立即调用 CountDownLatch.await() 方法。这样主线程的操作就会在这个方法上阻塞,直到其他线程完成各自的任务。
其他 N 个线程必须引用闭锁对象,因为他们需要通知 CountDownLatch 对象,他们已经完成了各自的任务。这种通知机制是通过 CountDownLatch.countDown()方法来完成的;每调用一次这个方法,在构造函数中初始化的 count 值就减 1。所以当 N 个线程都调 用了这个方法,count 的值等于 0,然后主线程就能通过 await()方法,恢复执行自己的任务。
再插一嘴:CountDownLatch 的 await() 方法使用不当很容易产生死锁,比如我们上面代码中的 for 循环改为:
for (int i = 0; i < threadCount-1; i++) {
.......
}
这样就导致 count 的值没办法等于 0,然后就会导致一直等待。
CyclicBarrier(循环栅栏)
介绍
CyclicBarrier 和 CountDownLatch 非常类似,它也可以实现线程间的技术等待,但是它的功能比 CountDownLatch 更加复杂和强大。主要应用场景和 CountDownLatch 类似。
CountDownLatch的实现是基于 AQS 的,而CycliBarrier是基于ReentrantLock(ReentrantLock也属于 AQS 同步器)和Condition的。
CyclicBarrier 的字面意思是可循环使用(Cyclic)的屏障(Barrier)。它要做的事情是:让一组线程到达一个屏障(也可以叫同步点)时被阻塞,直到最后一个线程到达屏障时,屏障才会开门,所有被屏障拦截的线程才会继续干活。
原理
CyclicBarrier 内部通过一个 count 变量作为计数器,count 的初始值为 parties 属性的初始化值,每当一个线程到了栅栏这里了,那么就将计数器减 1。如果 count 值为 0 了,表示这是这一代最后一个线程到达栅栏,就尝试执行我们构造方法中输入的任务。
//每次拦截的线程数
private final int parties;
//计数器
private int count;
下面我们结合源码来简单看看。
1、CyclicBarrier 默认的构造方法是 CyclicBarrier(int parties),其参数表示屏障拦截的线程数量,每个线程调用 await() 方法告诉 CyclicBarrier 我已经到达了屏障,然后当前线程被阻塞。
public CyclicBarrier(int parties) {
    this(parties, null);
}

public CyclicBarrier(int parties, Runnable barrierAction) {
    if (parties <= 0) throw new IllegalArgumentException();
    this.parties = parties;
    this.count = parties;
    this.barrierCommand = barrierAction;
}其中,parties 就代表了有拦截的线程的数量,当拦截的线程数量达到这个值的时候就打开栅栏,让所有线程通过。
2、当调用 CyclicBarrier 对象调用 await() 方法时,实际上调用的是 dowait(false, 0L)方法。 await() 方法就像树立起一个栅栏的行为一样,将线程挡住了,当拦住的线程数量达到 parties 的值时,栅栏才会打开,线程才得以通过执行。
public int await() throws InterruptedException, BrokenBarrierException {
  try {
    	return dowait(false, 0L);
  } catch (TimeoutException toe) {
   	 throw new Error(toe); // cannot happen
  }
}
dowait(false, 0L)方法源码分析如下:
    // 当线程数量或者请求数量达到 count 时 await 之后的方法才会被执行。上面的示例中 count 的值就为 5。
    private int count;
    /**
     * Main barrier code, covering the various policies.
     */
    private int dowait(boolean timed, long nanos)
        throws InterruptedException, BrokenBarrierException,
               TimeoutException {
        final ReentrantLock lock = this.lock;
        // 锁住
        lock.lock();
        try {
            final Generation g = generation;

            if (g.broken)
                throw new BrokenBarrierException();

            // 如果线程中断了,抛出异常
            if (Thread.interrupted()) {
                breakBarrier();
                throw new InterruptedException();
            }
            // count 减1
            int index = --count;
            // 当 count 数量减为 0 之后说明最后一个线程已经到达栅栏了,也就是达到了可以执行await 方法之后的条件
            if (index == 0) {  // tripped
                boolean ranAction = false;
                try {
                    final Runnable command = barrierCommand;
                    if (command != null)
                        command.run();
                    ranAction = true;
                    // 将 count 重置为 parties 属性的初始化值
                    // 唤醒之前等待的线程
                    // 下一波执行开始
                    nextGeneration();
                    return 0;
                } finally {
                    if (!ranAction)
                        breakBarrier();
                }
            }

            // loop until tripped, broken, interrupted, or timed out
            for (;;) {
                try {
                    if (!timed)
                        trip.await();
                    else if (nanos > 0L)
                        nanos = trip.awaitNanos(nanos);
                } catch (InterruptedException ie) {
                    if (g == generation && ! g.broken) {
                        breakBarrier();
                        throw ie;
                    } else {
                        // We're about to finish waiting even if we had not
                        // been interrupted, so this interrupt is deemed to
                        // "belong" to subsequent execution.
                        Thread.currentThread().interrupt();
                    }
                }

                if (g.broken)
                    throw new BrokenBarrierException();

                if (g != generation)
                    return index;

                if (timed && nanos <= 0L) {
                    breakBarrier();
                    throw new TimeoutException();
                }
            }
        } finally {
            lock.unlock();
        }
    }
实战
示例 1:
public class CyclicBarrierExample1 {
  // 请求的数量
  private static final int threadCount = 550;
  // 需要同步的线程数量
  private static final CyclicBarrier cyclicBarrier = new CyclicBarrier(5);

  public static void main(String[] args) throws InterruptedException {
    // 创建线程池
    ExecutorService threadPool = Executors.newFixedThreadPool(10);

    for (int i = 0; i < threadCount; i++) {
      final int threadNum = i;
      Thread.sleep(1000);
      threadPool.execute(() -> {
        try {
          test(threadNum);
        } catch (InterruptedException e) {
          // TODO Auto-generated catch block
          e.printStackTrace();
        } catch (BrokenBarrierException e) {
          // TODO Auto-generated catch block
          e.printStackTrace();
        }
      });
    }
    threadPool.shutdown();
  }

  public static void test(int threadnum) throws InterruptedException, BrokenBarrierException {
    System.out.println("threadnum:" + threadnum + "is ready");
    try {
      /**等待60秒,保证子线程完全执行结束*/
      cyclicBarrier.await(60, TimeUnit.SECONDS);
    } catch (Exception e) {
      System.out.println("-----CyclicBarrierException------");
    }
    System.out.println("threadnum:" + threadnum + "is finish");
  }

}
运行结果,如下:
threadnum:0is ready
threadnum:1is ready
threadnum:2is ready
threadnum:3is ready
threadnum:4is ready
threadnum:4is finish
threadnum:0is finish
threadnum:1is finish
threadnum:2is finish
threadnum:3is finish
threadnum:5is ready
threadnum:6is ready
threadnum:7is ready
threadnum:8is ready
threadnum:9is ready
threadnum:9is finish
threadnum:5is finish
threadnum:8is finish
threadnum:7is finish
threadnum:6is finish
......
可以看到当线程数量也就是请求数量达到我们定义的 5 个的时候, await() 方法之后的方法才被执行。
另外,CyclicBarrier 还提供一个更高级的构造函数 CyclicBarrier(int parties, Runnable barrierAction),用于在线程到达屏障时,优先执行 barrierAction,方便处理更复杂的业务场景。
示例 2:
public class CyclicBarrierExample2 {
  // 请求的数量
  private static final int threadCount = 550;
  // 需要同步的线程数量
  private static final CyclicBarrier cyclicBarrier = new CyclicBarrier(5, () -> {
    System.out.println("------当线程数达到之后,优先执行------");
  });

  public static void main(String[] args) throws InterruptedException {
    // 创建线程池
    ExecutorService threadPool = Executors.newFixedThreadPool(10);

    for (int i = 0; i < threadCount; i++) {
      final int threadNum = i;
      Thread.sleep(1000);
      threadPool.execute(() -> {
        try {
          test(threadNum);
        } catch (InterruptedException e) {
          // TODO Auto-generated catch block
          e.printStackTrace();
        } catch (BrokenBarrierException e) {
          // TODO Auto-generated catch block
          e.printStackTrace();
        }
      });
    }
    threadPool.shutdown();
  }

  public static void test(int threadnum) throws InterruptedException, BrokenBarrierException {
    System.out.println("threadnum:" + threadnum + "is ready");
    cyclicBarrier.await();
    System.out.println("threadnum:" + threadnum + "is finish");
  }

}
运行结果,如下:
threadnum:0is ready
threadnum:1is ready
threadnum:2is ready
threadnum:3is ready
threadnum:4is ready
------当线程数达到之后,优先执行------
threadnum:4is finish
threadnum:0is finish
threadnum:2is finish
threadnum:1is finish
threadnum:3is finish
threadnum:5is ready
threadnum:6is ready
threadnum:7is ready
threadnum:8is ready
threadnum:9is ready
------当线程数达到之后,优先执行------
threadnum:9is finish
threadnum:5is finish
threadnum:6is finish
threadnum:8is finish
threadnum:7is finish
......
参考
- Java 并发之 AQS 详解:https://www.cnblogs.com/waterystone/p/4920797.html
- 从 ReentrantLock 的实现看 AQS 的原理及应用:https://tech.meituan.com/2019/12/05/aqs-theory-and-apply.html